Every year our family tie-dyes our shirts for the Fourth of July! It's a tradition our kids (and I) look forward to every year, After years of pulling out big buckets of water and dye, I swapped out the mess for a simpler, faster and better way to tie-dye without the huge prep & mess. Of course, they have ready to use tie-dying kits at the local craft stores, but they can be expensive or sold out. This method helps you create a simple method that makes tie-dying super easy to pull out and do any time of year using inexpensive materials you can reuse over and over again.
What's this easy method? First, let's gather up your supplies!
- White T-shirts (I recommend to buy in bulk so you'll always have shirts on hand to pull out another day to dye)
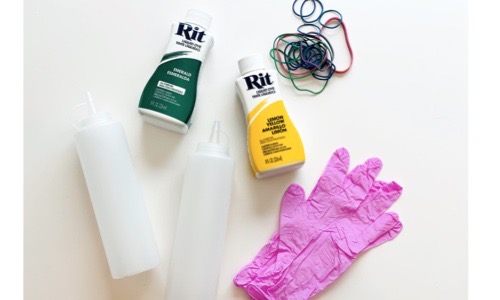
- Plastic Squirt Bottles (clear empty containers I found at the dollar store. Generally used for condiments at picnics)
- Rubber Gloves (also found at the dollar store)use
- Liquid or powder dye colors of your choice (we use Rit brand)
- Rubber Bands
- Drying Rack - I use my metal kitchen cooling rack (normally used for cooling cookies & cakes)
- Plastic tarp or area that is safe to dye on
TIP! I purchased a plastic tub to keep all the supplies year-round. Then there is no searching for everything when I need it.
Now let's mix your colors! You'll need...
- Gloves
- Dyes ( Liquid or powdered)
- Hot water (you can use it straight from your kitchen sink, not boiling)
- Salt
- Squeeze bottle containers
1. With your gloves on, add 2 tablespoons of liquid dye or 1/2 teaspoon of powdered dye to each squeeze bottle.
2. Add 1 tablespoon of salt to each squeeze bottle.
3. Then slowly add hot water to each squeeze bottle, filling to the top.
4. Place the top back on the squeezer bottle and place your finger over the top of the opening and shake well.
TIP! You can prep all your bottles ahead of time with the dye and salt. Then add the hot water to each bottle just before you start dying!
Let's get tie-dying!
For this step you'll need:
- T-shirts
- Rubber Bands
- Drying Rack (this lifts up the shirt and allows the air to dry it, rather than the dye puddling under the fabric)
** Remember to Use an area you are ok with dye possibly falling on ( we usually dye on our lawn)**
1 Wrap your t-shirt with rubber bands. Here are a few ways you can wrap them to create different patterns.
2. After wrapping the shirt in your selected design, wet your t-shirt under cool running water - squeezing out any excess water.
3. Place your wrapped t-shirt on top of your baking rack.
4. Design away! Squirt the dye color on your shirt.
5. Let your t-shirt dry on the baking rack for about one hour in the warm sun.
6. Rinse your t-shirt again in cool running water until the water turns clear.
7. Remove rubber bands carefully using scissors.
8. Lay the shirt out to dry and enjoy!
TIP! Wash your t-shirt in only cold water washer settings and hang dry.